
Setting up/troubleshooting Telnyx app in Zoho CRM
- Daniel Kalman
- Sep 27, 2023
- 8 min read
Updated: Jun 13, 2024
Telnyx is a cloud-based platform that helps send individual or mass SMS, either scheduled or in real-time, to our customer database.
Below are the requirements and steps to follow in case you'll be setting up a new Telnyx account or re-connecting our Telnyx account to Zoho CRM. Permission to edit settings are only given to manager and operations support.
1. Pre-requisites for plugin set-up
Should have Zoho CRM account (Professional or Enterprise Edition)
Should have Telnyx account
Should install this plugin by Telnyx from Zoho Marketplace
2. Features of Telnyx plugin
Send single SMS
Send bulk SMS
Send messages from the Leads, Contacts, Deals and Accounts module
Create and manage templates inside Zoho CRM
View message history inside Zoho CRM
Send automated messages using workflows
3. Plugin installation and configuration
Right after installation of the plugin, we'll need to connect our Telnyx account to Zoho CRM and configure the settings of both platforms.
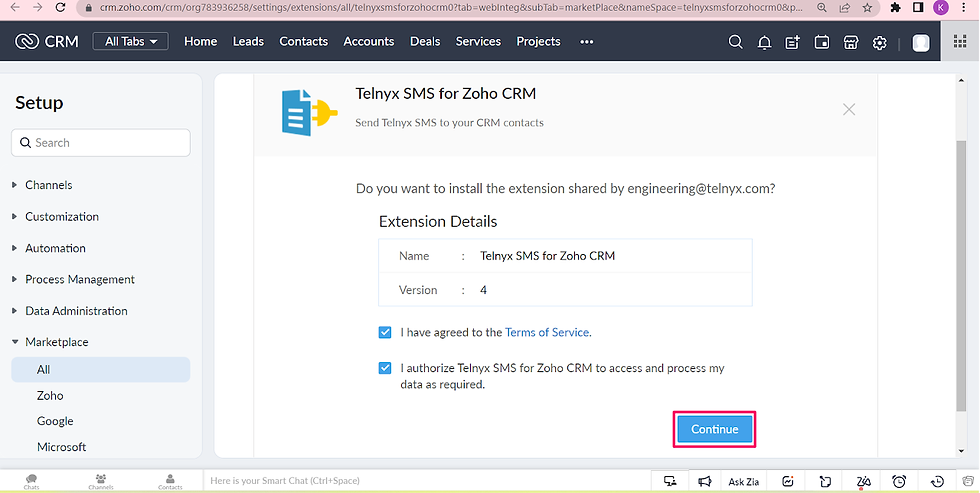
Step 1: Go to the Zoho marketplace and search for the application "Telnyx SMS for Zoho CRM". Click the "Install" option to install the application in your account. Agree to the terms and conditions displayed by clicking the check box and then, click "Continue".
Step 2: Choose the profile to whom you want to install the application and click "Confirm".
Step 3: Now, you will be asked to authorize your Zoho account. Click the "Authorize Now" button to authorize the account.
Step 4: Click "Accept" to confirm the authorization.

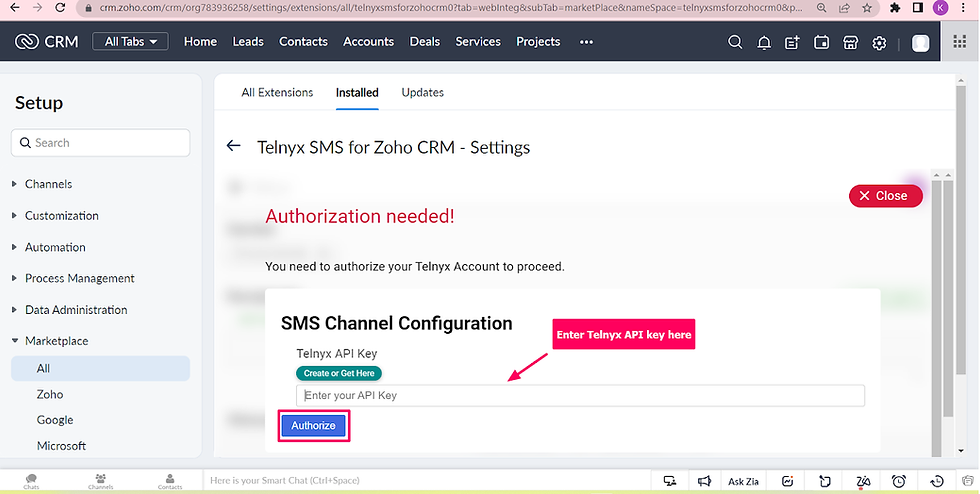
Step 5: Now, to authorize the Telnyx account, enter your API account in the space provided. To get the key, click the "Create or Get Here" option. Click "Authorize" to authorize the Telnyx account once the API key is entered.
Step 6: Either copy the API key already available in your account or use the "Create API key" option to create a new API key to integrate it with Zoho CRM. Check Telnyx Portal to make sure that the API connection worked and there is a number associated to the connection.


Step 7: Now, you can view Telnyx interface to send out messages. If you click on the profile icon at the right, you can view your authorized accounts, Workflow parameters fetching section, and Manage app users section.
Step 8: To modify setting, click the gear icon on the upper right corner of the Zoho CRM interface, click "All" under Marketplace, then click "Installed" to see apps already integrated to Zoho CRM. Afterwards, click "Settings". Scroll down to "For Admin" section and click "Incoming events sync" and toggle on. Douoble check the settings for "Manage App Users" as well.


Step 9. If you are sharing the Telnyx module with another CRM user, go to Zoho Settings > Module and Fields > Telnyx Message History. Click the three-dots icon beside Standard layout and view "Module Permissions". Check if the other user is allowed to access Telnyx Message History module. This should have both "Administrator" and "Support".
Note: By default, only the Super Administrator account is able to see the full message history in the Telnyx module. Make sure that SMS records are assigned to the other CRM user (check "Telnyx Message History Owner" field) so they can see it on their end.
4. Webhook-action workflow rules
Setting up the webhooks is important because this will enable the functions of Telnyx plugin in Zoho CRM. If webhooks are not properly configured, sending SMS will not be possible.
Step 1: Click the gear icon on the upper right corner of the Zoho CRM interface, click "All" under Marketplace, then click "Installed" to see apps already integrated to Zoho CRM.
Step 2: Choose "Settings" and click "Workflows" under For Admin. Configuration details for webhook will pop up. Keep this browser tab open so you can easily access the tokens and parameter codes.
Step 3. In a new browser tab, open CRM.
Step 4. Click the gear icon on the upper right corner of the Zoho CRM interface, click "Actions" under Automation, then click the "Webhooks" tab.
Step 5. Select "Configure Webhook" button.
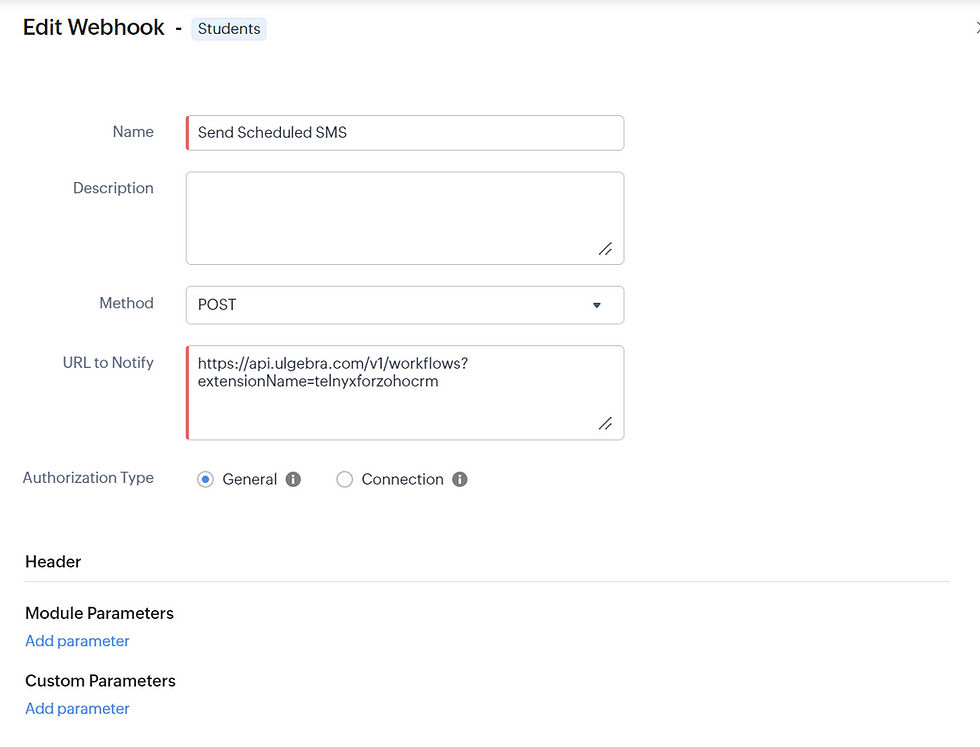
Step 6: Under "Edit Webhook", give a name and description for the Webhook and select the method as POST. Paste the webhook URL in the space provided which you have already copied from other tab that has the configuration details for webhook. Set Authorization Type to "General". Also, choose the module that is related to this workflow webhook.

Step 7: Under "Body", select the Type as "Raw" and Format as "JSON". Paste the SMS parameter in the space provided and replace the "FILL_HERE" option with the required values. See screenshot below for reference.

SMS Parameters
"from" - Enter the Telnyx phone number with the country code
"to" - Enter the phone number field of the recipient (Click "#" and select the placeholder to fetch the value from the Zoho CRM field.)
"text" - Enter the message content to be sent
"module" - Enter the API name of the Zoho CRM module which you can get from the "Developer Space".
"recordId" - It can be, for example, Lead ID (Click "#" and select the placeholder to fetch the value from the Zoho CRM field.)
Once entered all the values, click the refresh option so that you will get the preview URL. Now, click the "Save and Associate" option to save the webhook.
Step 8: For getting the API name of the module, click the Zoho CRM settings at the top right and under "Developer Space", click the "APIs" option. Under "API names", you can find the values of the API names of all Zoho CRM modules. Copy the required API name as it is without any extra spaces and paste the value for the "module" parameter in the workflow.
Step 9: Now, click "Save" to save the created workflow. The new workflow has been created.
Step 10. Go to Workflow Rules and create an automation using the Instant Action "Webhook". Select the webhook you created so that whenever the condition is met, the webhook will be triggered and the scheduled messages will be received by the contact.
5. Workflow configuration in Zoho CRM
This is the final process you'll need to complete before you're able to use the Telnyx plugin in Zoho CRM. Zoho workflows help users automate some tasks that is not set up by default. The workflow configurations below will help us enable some features that makes usage of this plugin smoother and data it generates more organized.
Step 1: Click the Zoho CRM settings option at the top right and click the "Workflow Rules" option under Automation.
Step 2: Click "Create Rule" option to create a new workflow rule.
Step 3: Select the module for which the workflow has to be executed and give a name and description for the workflow rules.
Module: Telnyx Message History
Rule Name: Outbound SMS Marked as Read
Description: This rule automatically mark the outbound messages as read.
Module: Telnyx Message History
Rule Name: Change Owner to CRM SupportDescription: This rule automatically changes the record owner to another user "CRM Support".
Module: Students
Rule Name: Send Scheduled SMS to Students
Description: This rule enables user to schedule sending an SMS using the "Scheduled Outbound SMS" section in the Students module.
Module: Students
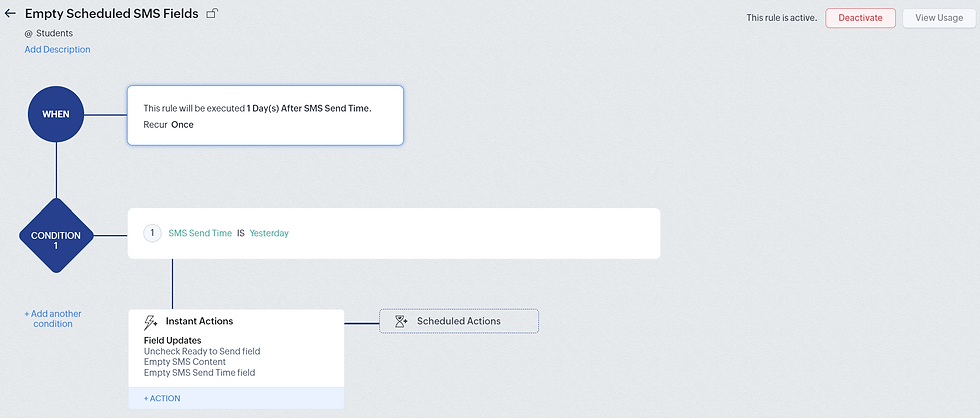
Rule Name: Empty Scheduled SMS Fields
Description: This rule automatically empties the field values under "Scheduled Outbound SMS" after a scheduled message is sent.
Step 4: Select the condition for the trigger and for whom the workflow has to be created based on the requirement. Copy the setup below.
Trigger for Rule: Outbound SMS Marked as Read

Trigger for Rule: Change Owner to CRM Support

Trigger for Rule: Send Scheduled SMS to Students

Trigger for Rule: Empty Scheduled SMS Field
Step 5: Set up the actions you want to execute when the above conditions are met. Copy the configuration below.
Actions for Rule: Outbound SMS Marked as Read

Actions for Rule: Change Owner to CRM Support

Actions for Rule: Send Scheduled SMS to Students

Actions for Rule: Empty Scheduled SMS Fields


If Telnyx plugin in Zoho CRM isn't functioning as it should be for some reason, below are some steps you can do to troubleshoot the error.
Initiate Zoho re-authorization
Do a test if you suspect that Telnyx is not functioning properly. On rare occasions, it's not able to record the outbound SMS or receive inbound SMS. If indeed it's the case, try troubleshooting the plugin using the following steps.
Step 1. Go to Zoho CRM Settings > Marketplace > All > Installed > Telnyx SMS for Zoho CRM > Settings
Step 2. When you're on the Settings page, scroll to the bottom until you reach the "Advanced" section and click Re-Authorize Zoho. When an Ulgebra window pops up, click "Accept".

Step 3. Make sure that both crm@moversandshakersdance account and the super admin account complete the re-authorization process.
Uninstall and re-install Telnyx plugin (not recommended)
Uninstalling and re-installing this plugin will mean that existing plugin data, such as SMS history records, will be deleted entirely. This is our last resort to fix the issue.
Step 1. Go to Zoho CRM Settings > Marketplace > All > Installed
Step 2. You'll see all the plugins we have installed in Zoho CRM. Under the "Telnyx SMS for Zoho CRM" plugin, click "Uninstall".

Step 3. Give it a good 20 minutes before re-installing the Telnyx plugin.
Step 4. Reinstall the plugin and set it up. Afterwards, send a test SMS and check if the error was fixed.
If the error still persists despite Zoho re-authorization, kindly send a detailed message about the error to support@ulgebra.zohodesk.com and report the incident. Historically, there will be few back and forths with support team over email before meeting with us, together with their tech rep. They will only set a meeting with us after they figured out a solution to the issue. During the meeting, the tech rep will work on the issue and may need to request remote access to our account. This is permitted as long as MaS team member supervises it (e.g. tech team shares their screen while accessing the account).
Relevant questions to bring up during the meeting:
What was the reason for the error? What triggered it?
Before we're able to {do this feature}, but now it always requires us to {point out inconvenient process}. How do we fix this? - Example: Before we're able to send any message, it always requires us to click Telnyx account and re-enter API key. How do we fix this?
We {did one thing that altered the original state of this module}. How do we make sure {it works smoothly like it did during the previous state}? - Example: We purchased 9 other numbers (total now is 10). How do we make sure inbound and outbound SMS for those other 9 numbers are also recorded in the Telnyx module?
How can this error be avoided in the future? What should we look out for?
Can we recover lost data?
It will take more or less 1 week between the initial contact and tech support meeting. While waiting for issue to get fixed, check out this article to know how to still use Telnyx to receive and send messages, and monitor SMS delivery status manually.